


Getting Started Tutorial for FotoJet Photo Editor
1. Getting Started
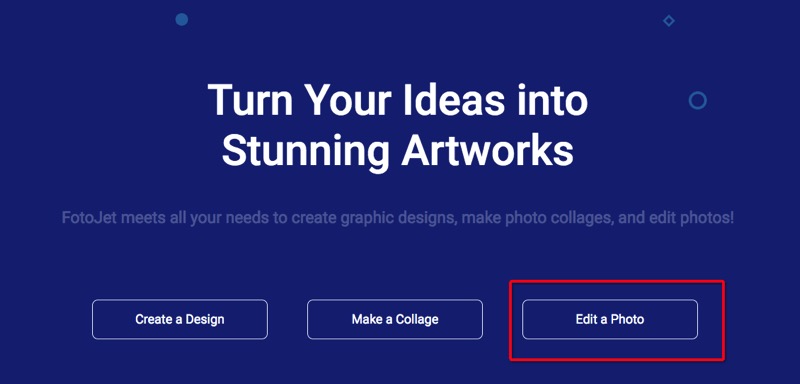
Open www.fotojet.com in your browser. On the homepage, click Edit a Photo button to kick it off.
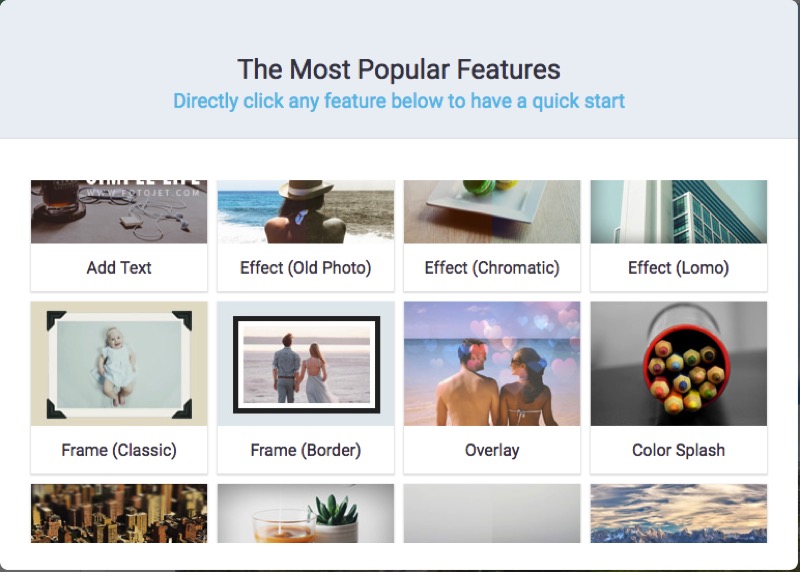
You will be welcomed with a window showing the most popular features and you can directly click any feature to have a quick start.
2. Open a Photo
You can upload your own photo to edit or play with our image sample.
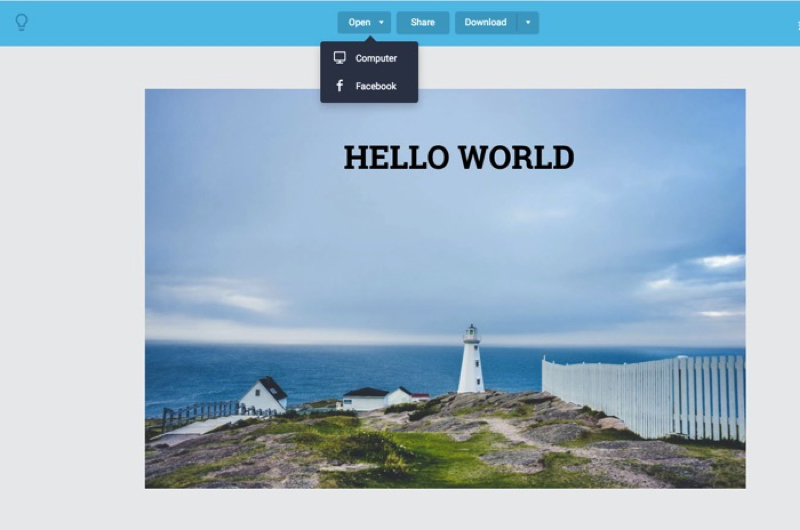
Click Open button on the top banner and then choose to upload a photo from computer or from Facebook.
Choose Computer and then select your own photo from local disk to edit.
Choose Facebook and then login to your Facebook account to select desired photo from your Facebook albums to edit.
3. Basic Edits
Crop
Choose Edit tab on the left side bar and click Crop button under BASIC section. Next, adjust the crop box to specify the area of the photo you wish to keep. Afterward, click Apply to save the changes.
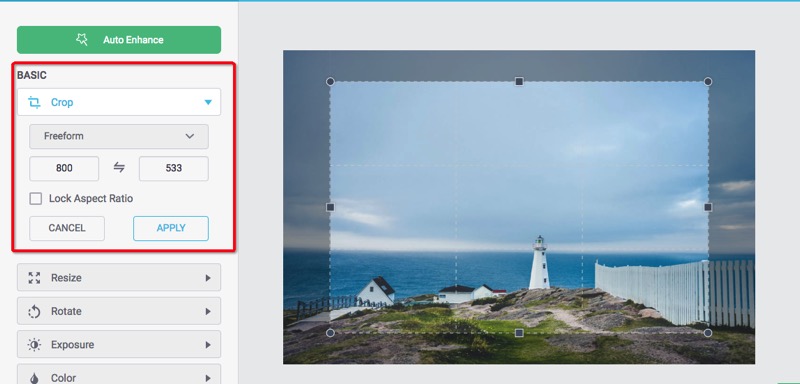
Or click the dropdown menu to choose a preset aspect ratio from the list directly, including Freeform, Original Ratio, Golden Radio, 16x9, 3x4, Facebook Cover, YouTube Channel Art, etc. Then move the crop box on photo to keep the part you desire.
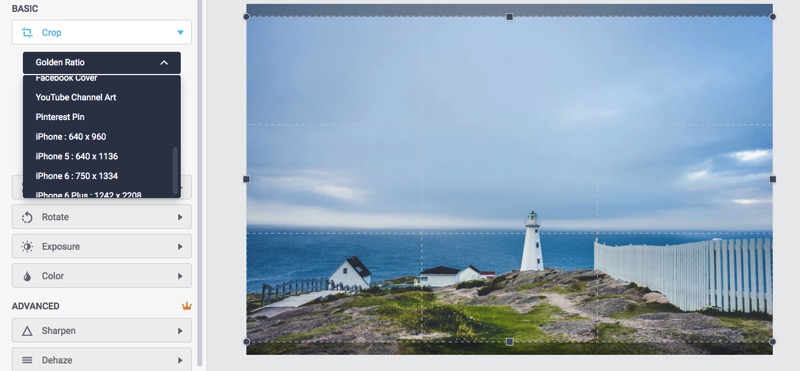
You can also directly input the value you need in the input box to crop your photo.
Tip: Check Lock Aspect Ratio box to keep the relationship between width and height proportion.
Click Apply to apply all the changes you made.
Click Cancel to exit.
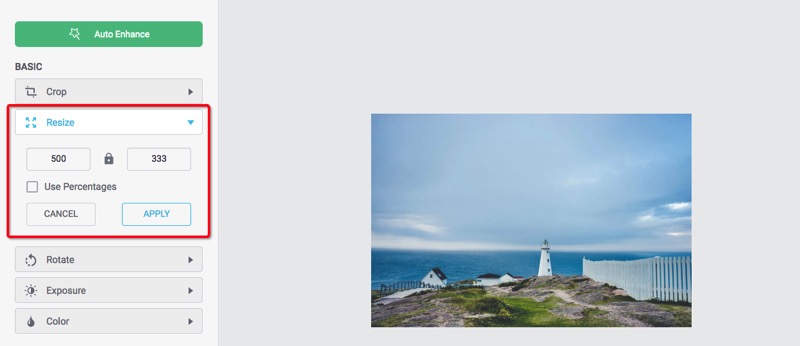
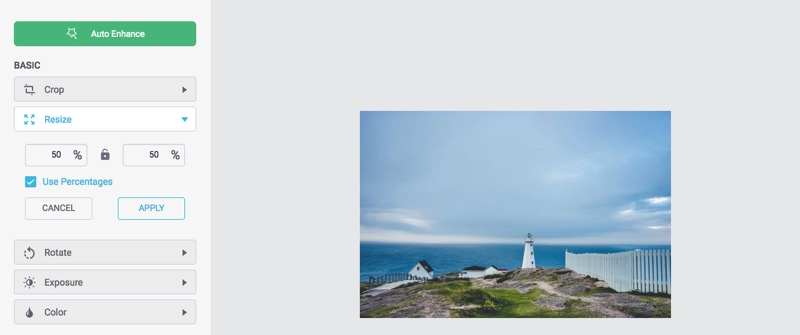
Resize
Click Resize button under BASIC section, and then input the width and height at will to set an exact size in pixels.
Tips:
1. If you don’t want to keep proportion when resizing, click the lock icon to make it unlocked.
2. Check Use Percentages to resize your photo in percentage. Then directly input the percent value you want.
Click Apply to apply all the changes you made.
Click Cancel to exit.
Rotate
Click Rotate button to unfold the options.
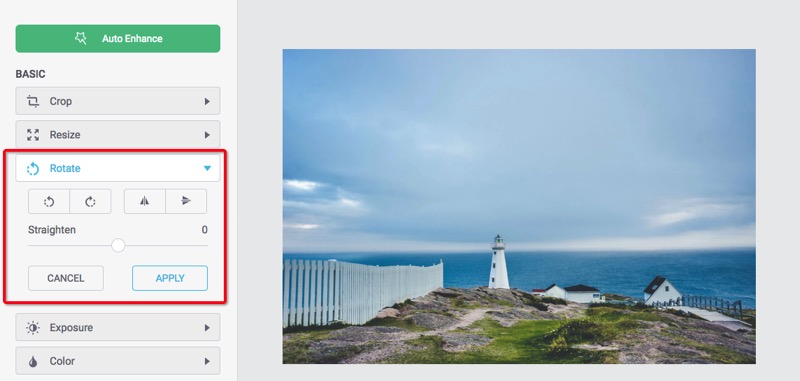
Click  or
or  to rotate the photo by 90 degrees clockwise or by 90 degrees anti-clockwise.
Click  or
or  to flip photo horizontally or vertically.
Drag the Straighten slider to adjust the photo in various angles.
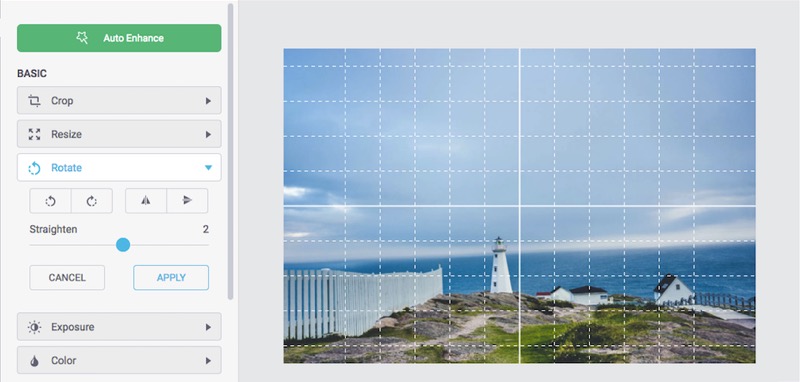
Click Apply to apply all the changes you made.
Click Cancel to exit.
4. Enhance Photo
Exposure
Click Exposure button to unfold the options.
Drag the sliders to adjust the Exposure, Brightness, Contrast, Highlights and Shadows to your satisfaction.
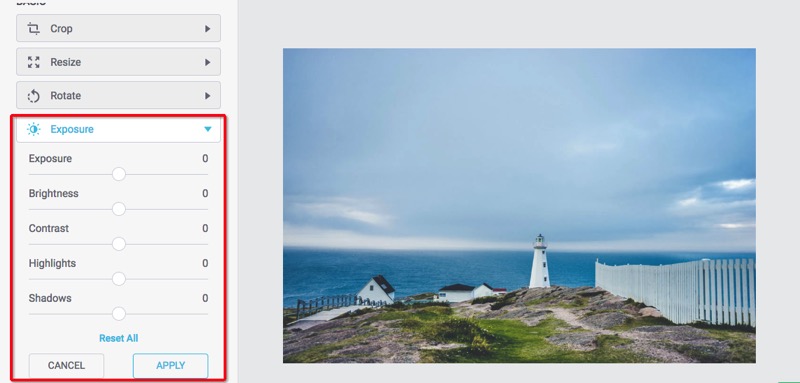
Click Reset All to reset all the adjustments if you are not satisfied with the results.
Click Apply to apply all the changes you made.
Click Cancel to exit.
Color
Click Color button to unfold the options.
Drag the slider to adjust Saturation, Temperature and Tint for photo.
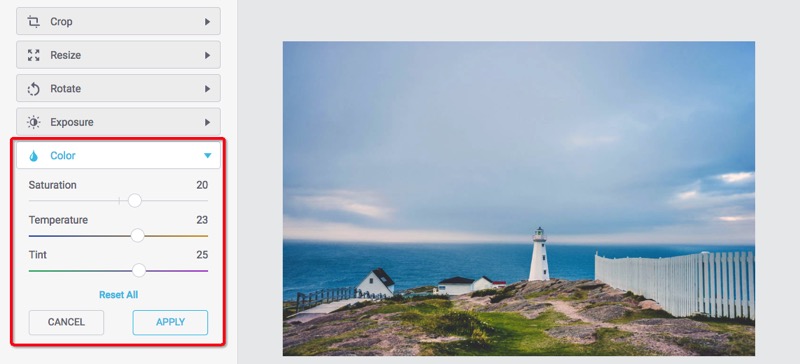
Click Reset All to reset all the adjustments if you are not satisfied with the results.
Click Apply to apply all the changes you made.
Click Cancel to exit.
5. Advanced Edits
Sharpen
Click Sharpen button under ADVANCED section to unfold the options.
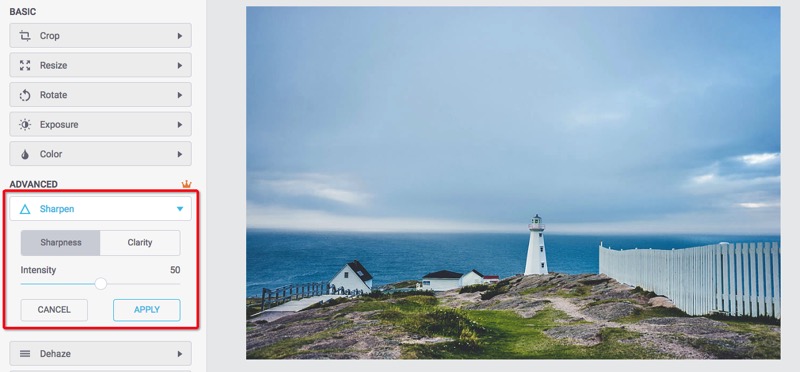
Choose Sharpness and drag the Intensity slider to sharpen the soft edges in your photo. Choose Clarity and slide Intensity to adjust the photo clarity.
Click Apply to apply all the changes you made.
Click Cancel to exit.
Vignette
Click Vignette button under ADVANCED section to unfold the options.
The default color is black. Click  to choose the specific vignette color you want. Drag the Intensity slider to adjust the intensity of vignette effect.
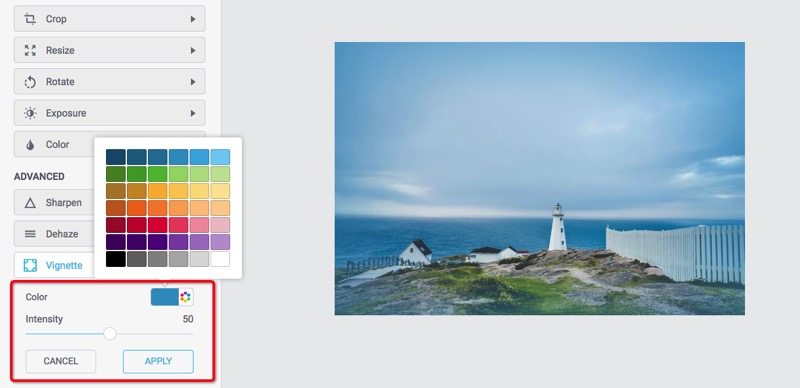
Click Apply to apply all the changes you made.
Click Cancel to exit.
Radial Focus and Tilt Shift
Click Focus button under ADVANCED section to unfold the options.
Switch between Radial and Tilt Shift mode to choose the shape of your photo’s focus point.
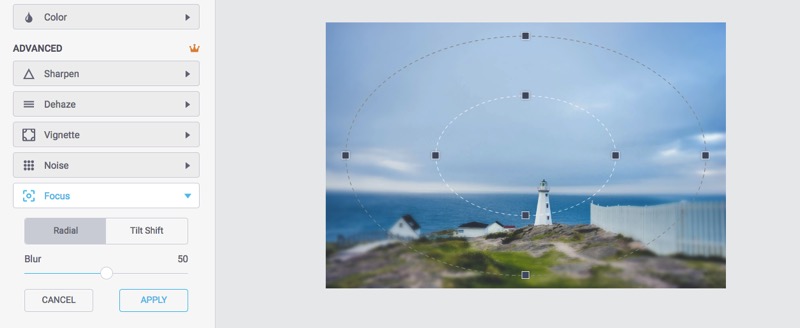
Choose Radial mode, a circular target will appear on top of your photo. Drag the handles to adjust the size of your focus point and move it to the exact part of your photo that you want to remain in focus.
Drag the Blur slider to adjust the intensity of blurriness.
Tips:
1. Move your mouse out of the photo, and you can preview how it looks like.
2. Press and hold Shift key to lock the aspect radio when adjusting the size of outer focus point.
Choose Tilt Shift mode, and four lines will appear on top of your photo. Drag the handles on each line to adjust the size of your focus point until you create the ideal focus effect for your photo.
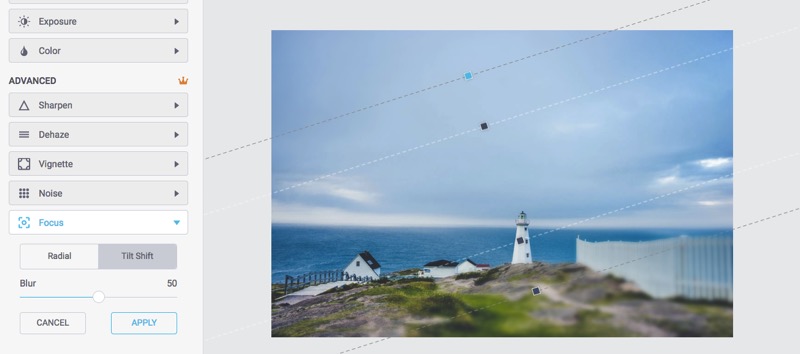
Drag the Blur slider to adjust the intensity of blurriness.
Click Apply to apply the effects you made.
Click Cancel to exit.
Color Splash
Click Color Splash button under ADVANCED section to unfold the options.
Choose Color mode to splash the gray scale image with color. Grab the slider to adjust Brush Size and Intensity. Then move the circular target over the photo to highlight the desired part while leaving the rest in gray scale.
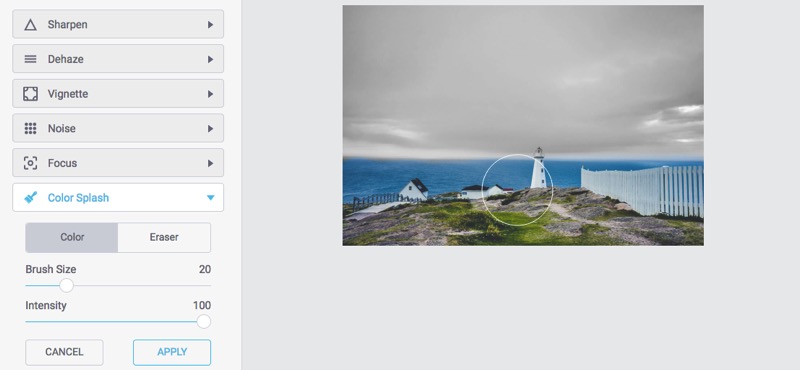
Switch to Eraser mode and grab the slider to adjust Brush Size and Intensity. Then move the circular target over the photo to erase away any highlighted color and bring it to gray effect.
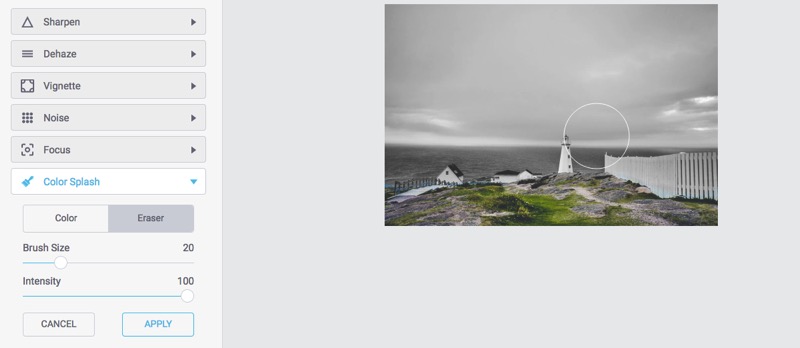
Clicke Apply to apply the effects you made.
Click Cancel to exit.
Selective Filter
Click Selective Filter button under ADVANCED section to unfold the options.
Switch between Radial and Gradient mode to apply special radial or gradient effects to the selected part of photo.
Choose Radial mode, a circular target will appear on top of your photo. Drag the handles to adjust the size of your selected area and move it to the exact part of your photo that you want to enhance.
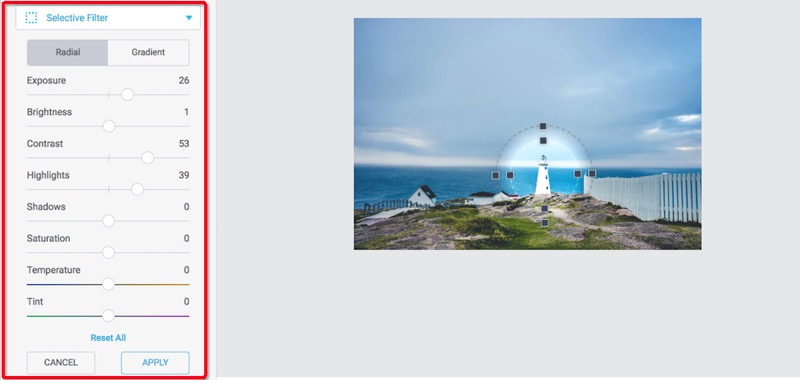
Then drag the slider to adjust Exposure, Brightness, Contrast, Highlights, Shadows, Saturation, Temperature and Tint to the selected part of your photo.
Or choose Gradient mode, a linear target will appear on top of your photo. Drag the handles to adjust the size of your selected area and move it to the exact part of your photo that you want to enhance.
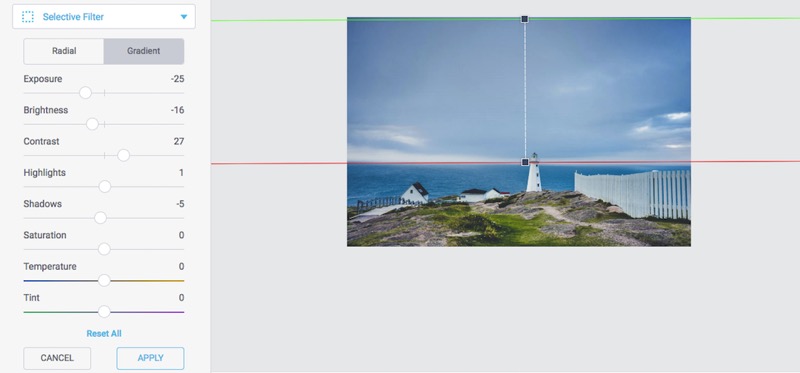
Then drag the slider to adjust Exposure, Brightness, Contrast, Highlights, Shadows, Saturation, Temperature and Tint to the selected part with a gradient effect.
Click Apply to apply the effects you made.
Click Cancel to exit.
6. Apply Photo Effect
Choose Effects tab on the left side bar. You will see lots of photo effects classified into 7 categories including B&W, Sepia, Vintage, Lomo, Old Photo, etc.
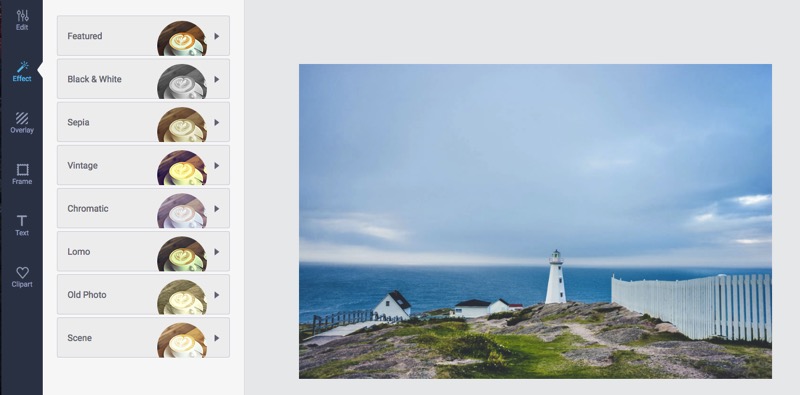
Click any category and scroll down to preview how you photo will look on each effect. Choose the best one you like to apply on your photo.
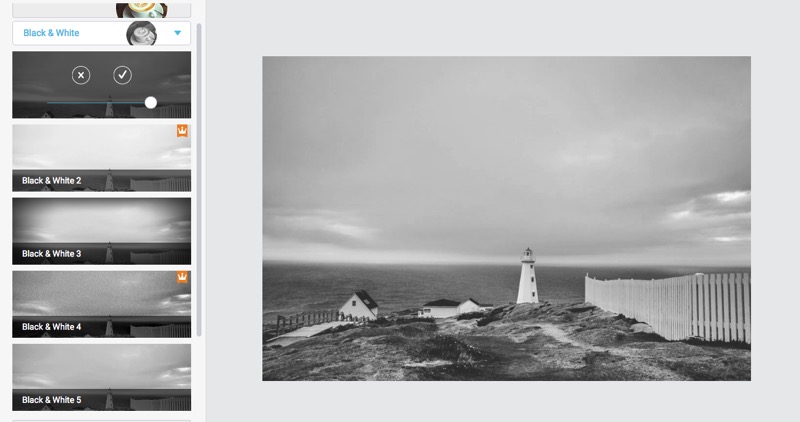
Drag the Intensity slider to adjust the intensity of effect.
Click Apply to apply the effect on your photo.
Click Cancel to exit.
7. Add Text and Clipart
Add and Edit Text
Choose Text tab on the left side bar and then you can freely add text to your photo.
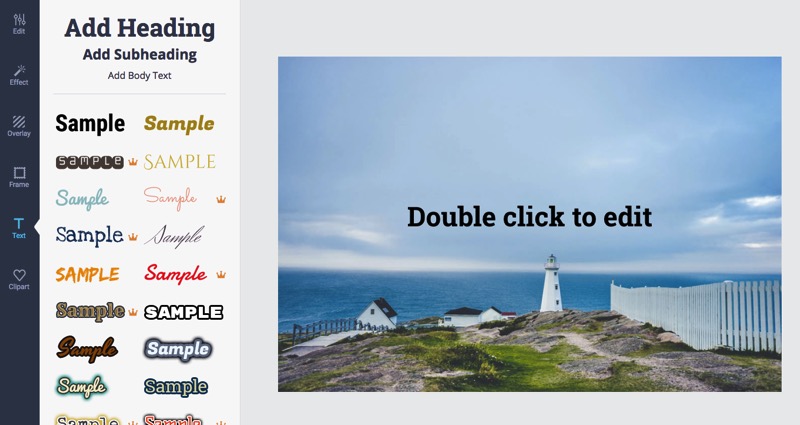
There are many preset text styles available. You can directly click and then a new text object will be added to your design.
You can move, resize and rotate any text object at will with mouse dragging.
Choose the text object you want to edit and then the editing panel will appear:
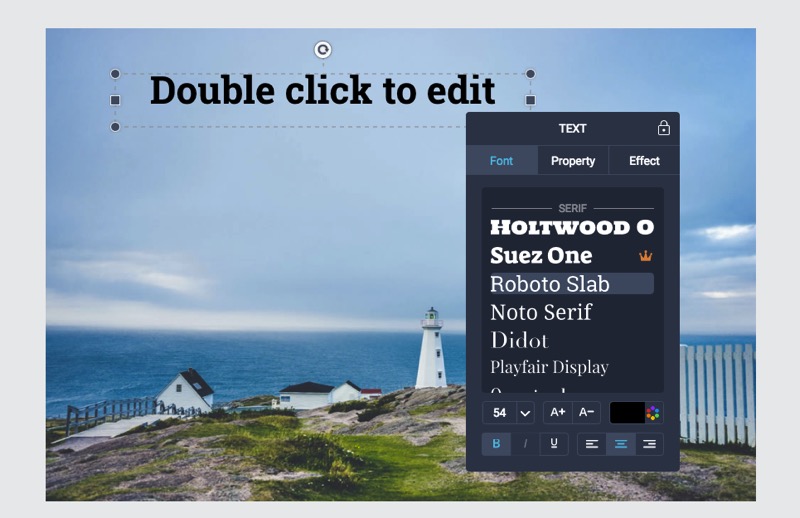
Choose Font option to set text font, size, color, style, etc.
Select a desired text font from the font library. Scroll down to preview all the text fonts.
Directly input the size properties you want for your text or click the size combo box to choose a desired text size.
Click  or
or  to make the text bigger or smaller quickly.
Click to apply a specific color to your text as needed.
Click on the appropriate button  to quickly set text format as Bold, Italic, and Underline.
Choose Property option and then adjust layer for text, duplicate or delete text.
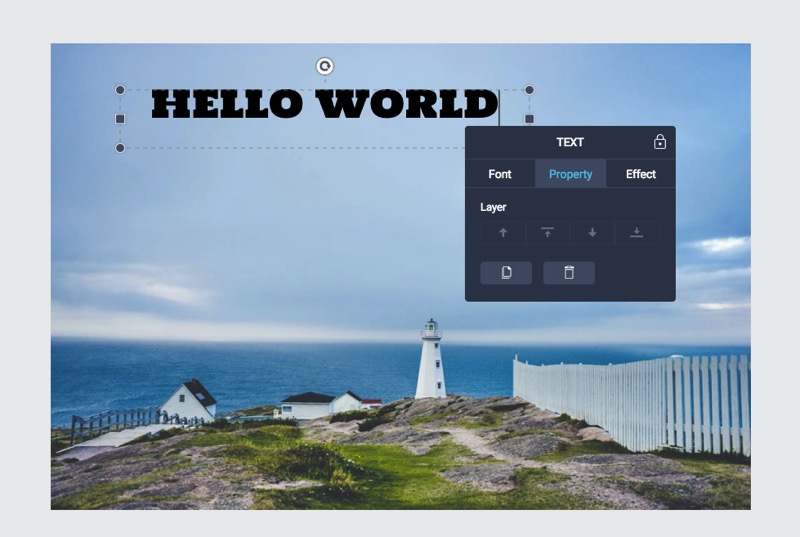
Click on the appropriate button  to adjust layer for text - move it forward, top, backward or bottom at will.
Click  to duplicate the selected text.
Click  to delete the text you selected.
Choose Effect option to set special effect for your text.
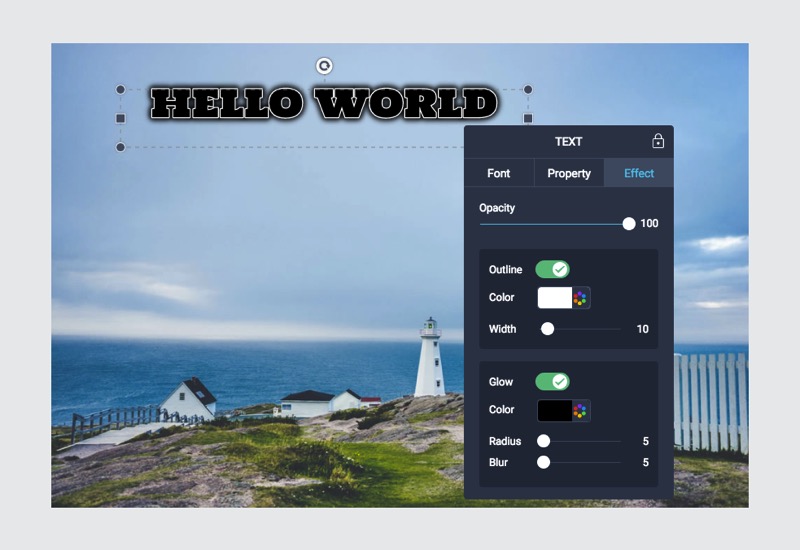
Drag the slider of Opacity to adjust opacity for your text.
Check Outline box and then select a special color. Drag the slider to adjust the Width.
Check Glow box and then select a special color. Drag the slider to adjust the Radius and Blur.
Add and Edit Clipart
Choose Clipart tab on the left side bar and then you can choose from our presets to use or search 93,000 clipart images from Internet to decorate your design.

The preset clipart images are arranged into several categories: Shape, Love, Travel, Embellishment, Celebration, Lifestyle, Nature, Holiday, etc. Choose any category and scroll down to preview all clipart images included in this category.
Or choose Internet option and then type in your search and press enter to find the related images.
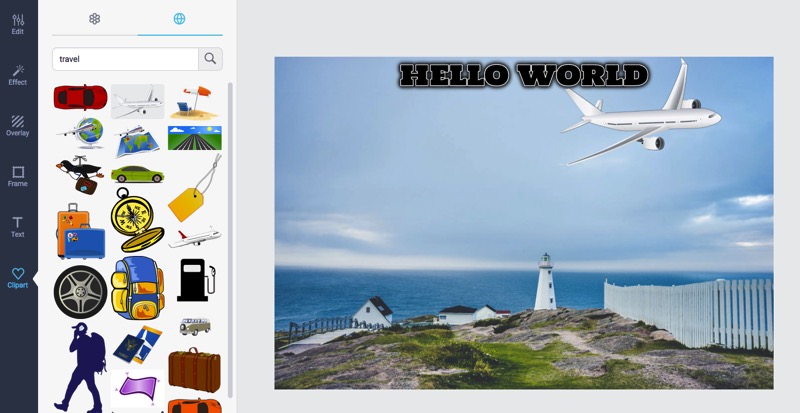
Click or drag your favorites to add on your photo.
You can move, resize and rotate any clipart image at will with mouse dragging.
Select a clipart image and the editing panel will appear:
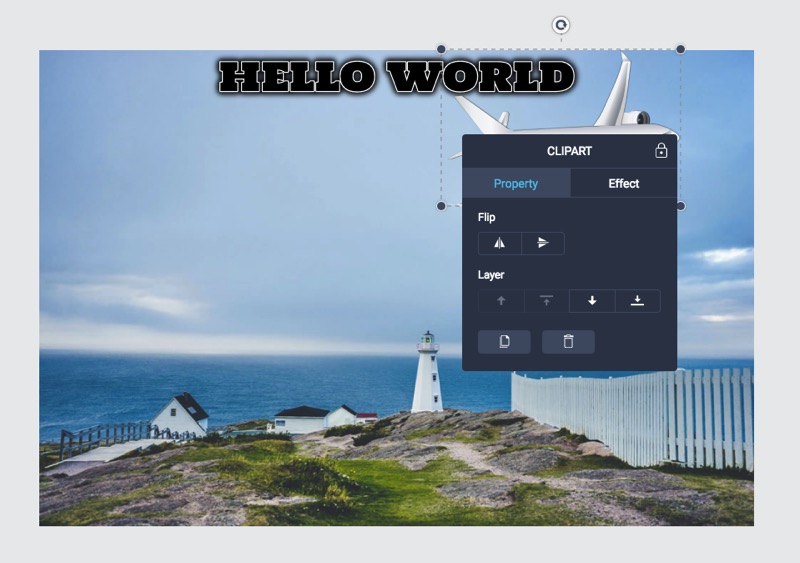
Choose Property option to adjust clipart properties easily.
Click  or
or  button to flip the clipart horizontally or vertically.
Click on the appropriate button to adjust layer for text - move it forward, top, backward or bottom at will.
Click to duplicate the clipart image.
Click to delete the clipart image you added.
Choose Effect option to adjust effect for the clipart image.
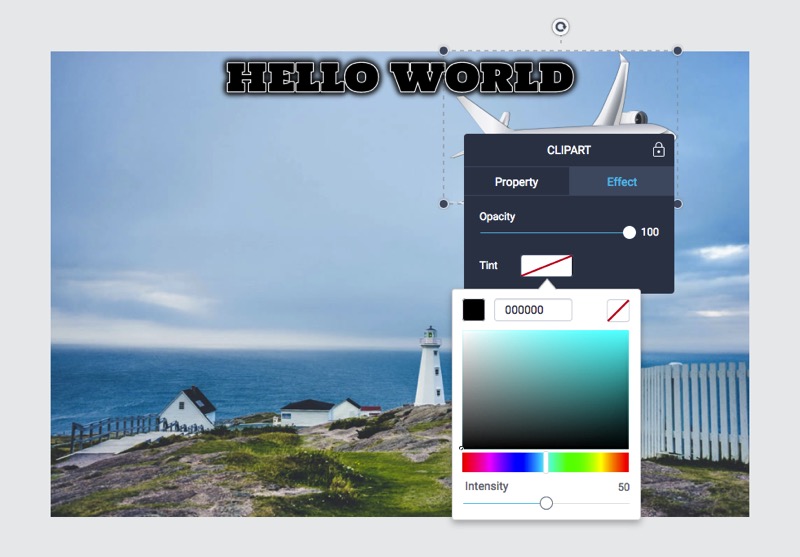
Drag the slider of Opacity to adjust the opacity properties for clipart.
Click  to apply Tint color. On the pop up color picker, pick the color overlay you want for the clipart. Drag the slider of Intensity to adjust the intensity properties for it.
Click  on the top right corner to restore the original color of your clipart.
8. Add Overlay
Click Overlay tab on the left side bar and then you will find lot of overlays, arranged into several categories: Bokeh, Light Trail, Montage, Space, Burst, Paper, etc.
Choose a category and click any overlay to directly use on your photo. Move the overlay over your photo to get final satisfaction with mouse dragging.
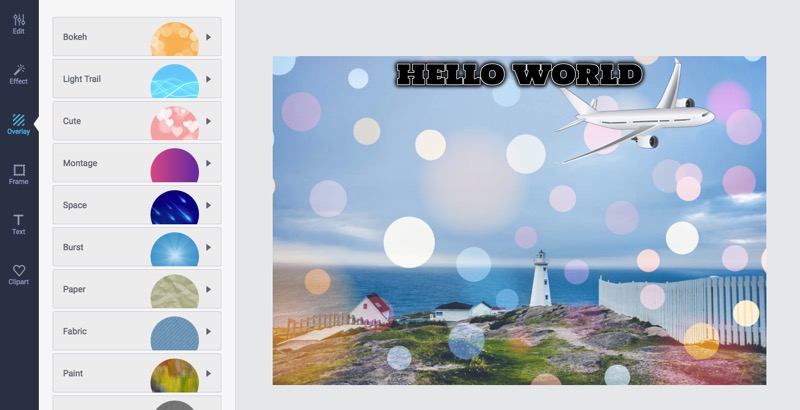
Drag the Intensity slider to adjust the intensity of overlay.
Click Advanced Options to show more adjustments.
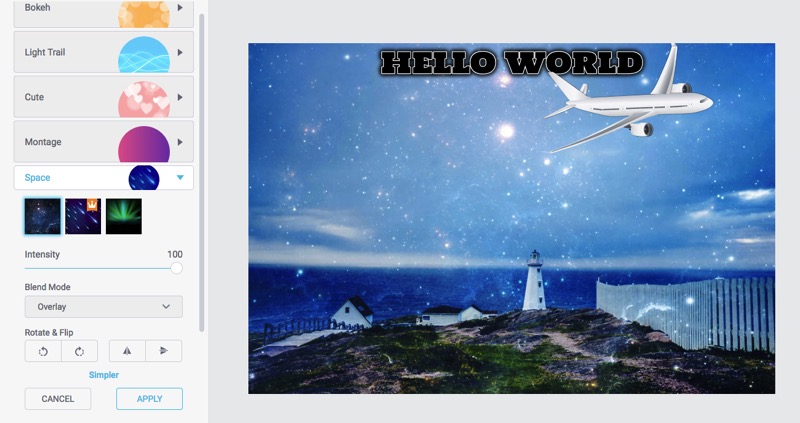
Click the combo box to choose a blend mode from Screen, Overlay, Multiply, Hardlight, and Darken for your overlay.
Click or button to rotate your photo by 90 degrees anti-clockwise or by 90 degrees clockwise.
Click or button to flip the photo horizontally or vertically.
Click Apply to apply all the changes you made.
Click Cancel to exit.
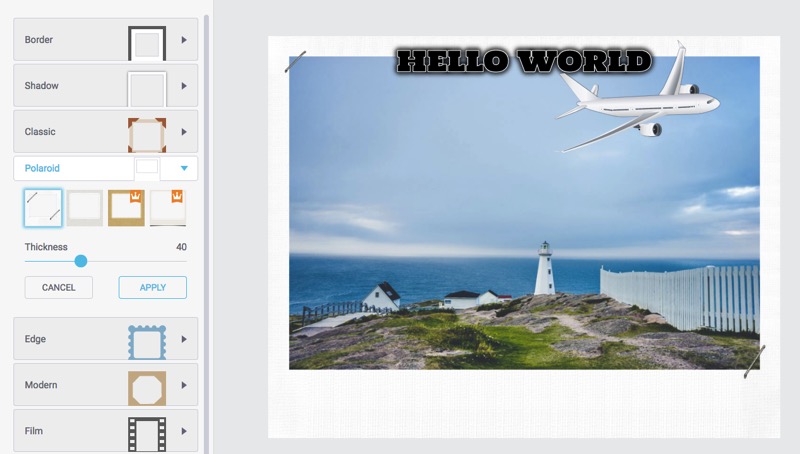
9. Add Frame
Click Frame tab on the left side bar and there are options for Border, Shadow, Classic, Polaroid, Edge, Modern, Film and Grunge.
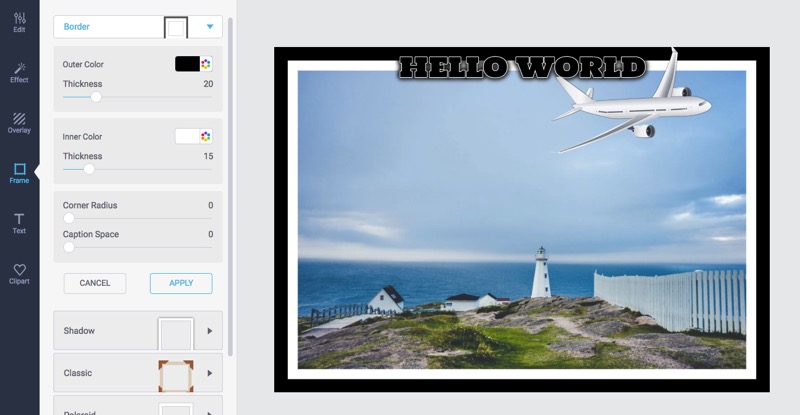
Choose Border option and directly add a border frame on your photo.. Click to apply the Outer Color and Inner Color. Drag the slider to adjust the Outer Thickness and Inner Thickness.
Drag the slider to adjust Corner Radius and Caption Space for the border frame.
Choose Shadow option and directly add a shadow frame on your photo.
Click to choose a shadow color. Drag the slider to adjust the Distance, Angle, Size and Fade.
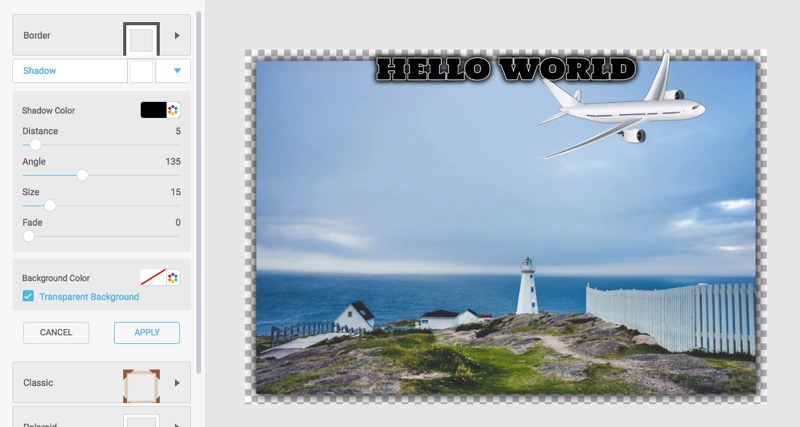
Click to choose a background color for the shadow. Or check Transparent Background to set a transparent background.
Or Choose other categories and select the best frame you want to use and adjust its Thickness freely.
10. Export
Download
Click Download button on the top banner to download your photo.
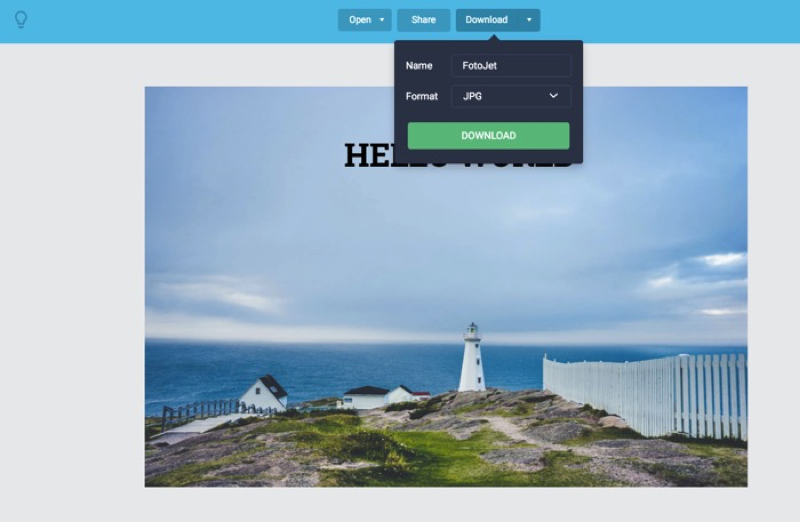
Set the name and choose the output format (JPG or PNG) for your photo.
Click DOWNLOAD and your photo will be automatically downloaded to your computer.
Share
Click Share button on the top banner to share your photo to Facebook, Twitter, Pinterest or Tumblr.
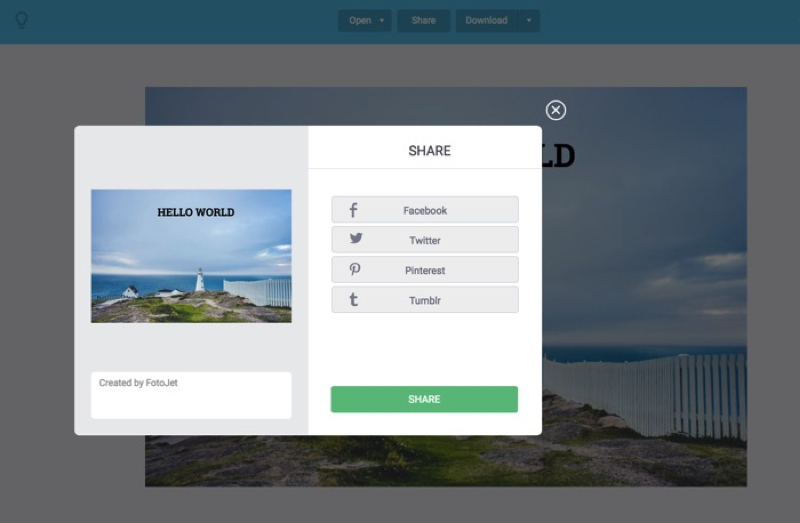
Choose Facebook and login to your Facebook account, then click SHARE to directly share your photo to Facebook.
Choose Twitter and login to your Twitter account, then click SHARE to share your photo to Twitter.
Choose Pinterest and FotoJet will upload your photo to server. After that, click SHARE and login to pin your photo to your Pinterest board.
Choose Tumblr and login to your Tumblr account, then click SHARE to share your photo to Tumblr.
Click Download button on the top banner and then choose Print to print your photo out.
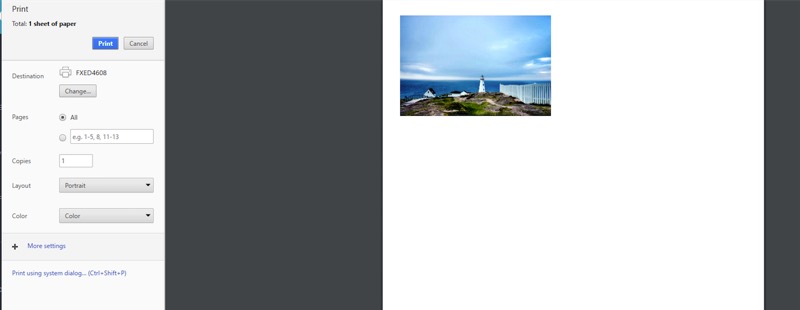
You can make print settings as per your needs.
Tips:
Click  button at the bottom of canvas to restore the original photo.
Click  button at the bottom of canvas or directly press Ctrl - Z to undo the last action you did.
Click  button at the bottom of canvas or directly press Ctrl - Shift - Z to redo the effect of undo action quickly.
Click  button at the bottom of canvas to show the before/after photo comparison.


 128 Bit SSL Secure Checkout

